This article will show step by step how to install Synology DSM 6.2.3 on a Proxmox (KVM) Virtual Machine using a Xpenology DSM bootloader.
Requirements (at the time of the writing):
- Proxmox VE 6.2-12 (or later) installed
- Xpenology Jun's Loader 1.03b for ds3615xs ( which can be found in this forum)
- DSM 6.2.3 (25426) file named "DSM_DS3615xs_25426.pat" (here)
(warning: images-intensive article)
Warning
This system is for testing or educational purpose ONLY, and It is NOT recommended for use in production environment because it has no support and it has not been proven stable/reliable.
So if DATA LOSS happens by using this system, this is ONLY on your own responsibility.
If you are happy with the testing of this product, I would highly recommend you to go for an original Synology hardware especially for PRODUCTION environment where data is critical.
We recommend ...
... at least 512MB RAM
... at least 16GB of free disk space
Please, click on pictures to zoom.
Create a new virtual machine
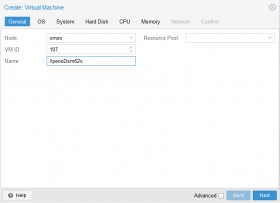
General
Select :
- VM ID: 107
- Name: XpenoDsm62x
Click NEXT
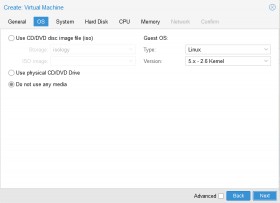
OS
Select : Do not use any media
Guest OS, Select :
- Type: Linux
- Version: 5.x - 2.6 Kernel
Click NEXT
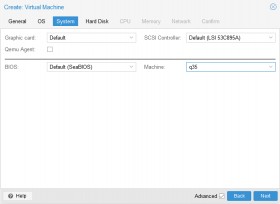
System
(Check "Advanced" checkbox at the bottom)
Select:
- Graphic Card: none
- SCSI Controller: Default (LSI 53C895A)
- BIOS: default (SeaBIOS)
- Machine: q35
Click NEXT
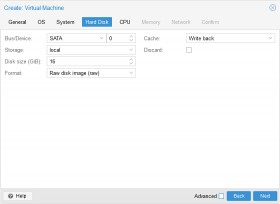
Hard Disk
(Uncheck "Advanced" checkbox at the bottom)
Select :
- Bus/Device: SATA 0
- Storage: local
- Disk size (GB): 16
- Format: Raw disk image (raw)
- Cache: Write back
- Discard: uncheck
Click NEXT
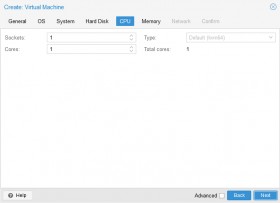
CPU
Select :
- Sockets: 1
- Cores: 1
- Type: Default (kvm64)
Click NEXT
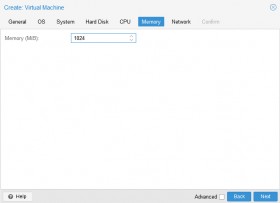
Memory
Select :
- Memory (MB): 1024 (or 512)
- (In Avanced mode) Ballooning Device: Uncheck (or Check if bootloader support it)
Click NEXT
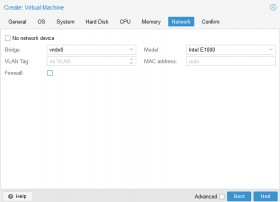
Network
Select
- Bridge: vmbr0 (or other of your proxmox)
- Model: Intel E1000 (or choose VirtIO if bootloader support it)
- Firewall: uncheck
Click NEXT
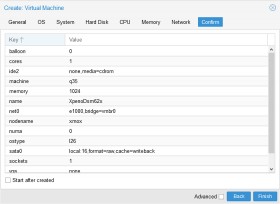
Confirm
Check config
Click on FINISH
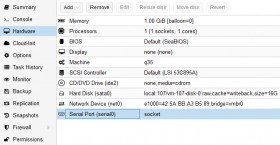
Hardware - Serial Port
On Hardware tab,
Click on Add button
Then Select Serial Port
Then Enter: Serial Port: 0
Click on Add button to validate
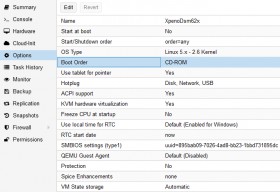
Options - Boot Order
On Options tab,
Select on Boot Order line
Then Click on Edit button
Then Select:
- Boot device 1:
CD-ROM - Boot device 2:
none - Boot device 3:
none
Then Click on OK button to validate
(Optional) Use tablet for pointer: No
Bootloader copy
Copy xpenology Jun's bootloader, previously downloaded, to proxmox server as /var/lib/vz/images/107/synoboot.img.
For that, you can use ftp or scp (or pscp for older windows).
In example:
pscp.exe "synoboot_103b_ds3615xs_virtio_9p.img" [email protected]:/var/lib/vz/images/107/synoboot.img
scp.exe "synoboot_103b_ds3615xs_virtio_9p.img" [email protected]:/var/lib/vz/images/107/synoboot.img
VM conf manual modification
We will do custom configuration to add the bootloader as usb disk with high priority boot.
On proxmox server, open a shell as root, and execute the following command: (Substitute your <VM ID> if not 107)
In the end, /etc/pve/qemu-server/107.conf file should look like that:
Start VM
For the first run, we gonna start the vm in command line.
Open a terminal on proxmox server as root:
Press Ctrl + o keys to exit from virtual terminal
If everything goes well, in the end, you should see "DiskStation login" prompt and the ip address acquired from dhcp, which is "192.168.0.29" in this case.
We are now ready to install Synology DSM.
DSM Install
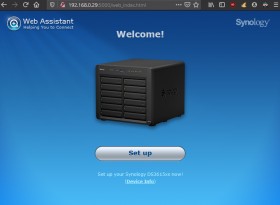
Open internet browser and go to (the ip address previously found) : 192.168.0.29:5000
Click on Set up button
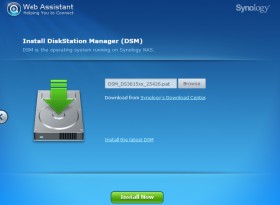
Installation
Click on Manual Install
Click on Browse and Select DSM_DS3615xs_25426.pat file ( that you have already downloaded)
Click on Install Now
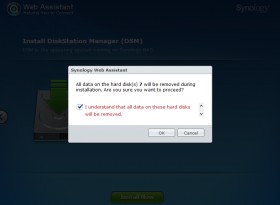
Read and Verify
Check I understand(...)all data(...)will be removed.
Click on Ok
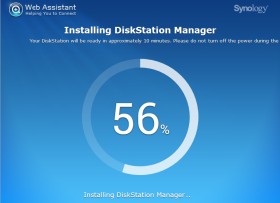
Wait until installation complete.
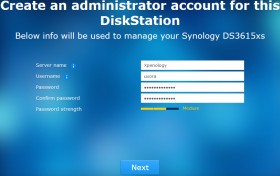
Configuration
Enter your:
- server name
- admin username
- admin password
Then click Next
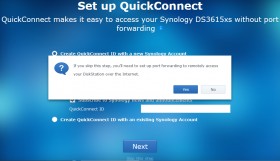
Click Skip this step (link at the bottom)
Then, in the popup, Click Yes
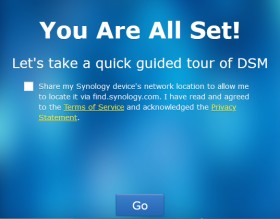
Done
Uncheck checkbox
Then click on Go
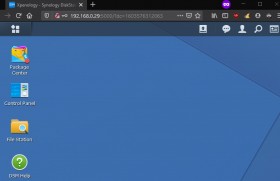
That's it! Your synology is now ready to use!
Proxmox backup template
Restore backup
To make things easier, some nice guys did some proxmox backup :
- Download proxmox backup which can be found in this forum's thread
- Transfer backup in proxmox repository folder
- In proxmox ve web gui,
- go to your repository then content tab
- select the backup
- click
Restorebutton
Boot to usb disk
These backups do not boot on usb disk but, instead, it boots the bootloader as normal sata disk.
If you want to change to usb disk boot :
- Detach "sata0: vm-107-disk-0.raw" (or comment it in conf file)
- Copy or Move "vm-108-disk-0.raw" to "synoboot.img"
- Change conf as explained previously in "VM conf manual modification" to add it as add usb disk
DSM Post-install
Desactivate auto update
First of all, I would recommend to disable automatic updates as follow:
- Go to "Control Panel" > "Update & Restore"
- On the "DSM Update" tab,
- Click on
Update Settings- Then select "Notify me and let me whether to install new update"
- Click on
OKto validate
Xpenology dsm update is done in the normal way with "Control Panel" > "Update & Restore" in web dsm gui.
However any update can break your xpenology, so before installing a new update :
- Check in this forum if someone already had successful update with similar configuration system
- Try in another VM the update and check that the system still work properly
Activate SSH terminal
On DSM web gui,
- Go to "Control Panel" and click on "Advanced Mode" (in top-right corner)
- Click on "Terminal & SNMP"
- In "Terminal" tab:
- Check "Enable SSH service"
- And enter a "Port" number (default 22)
- Click on
Applyto validate
Change xpenology vid, pid, serial or mac in grub
In grub.cfg file of the bootloader disk, you can specify :
- vid/pid of the bootloader disk
- synology serial number (we cannot help you obtain it, but maybe, you may want to read this thead )
- mac address (maybe with a mac address generator)
(Make sure, you did not eject usb disk from dsm gui)
Open a ssh terminal on xpenology server with an synology admin account
(or open a virtual terminal from proxmox server with qm terminal 107 with an synology admin account)
Reboot your xpenology server.
(Note: You may have a different IP from your dhcp if you have changed MAC address)
Power button install
In order to be able to properly shutdown xpenology vm from Proxmox VE, you need to install a package that will properly shutdown synology dsm when it receive a ACPI "power down" signal.
Download POWERBUTTON_6.2-0002.SPK file in this forum's thread.
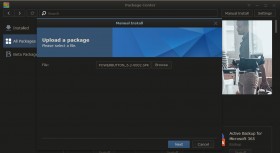
On DSM web gui,
- Go to "Package Center" and click on "Manual Install" (in top-right corner)
- In popup:
- Click on
Browse - Select POWERBUTTON_6.2-0002.SPK file (previously downloaded) then click on
Open - Click on
Next - In another popup about "unknown publisher", Click on
Yes
- Click on
- In "Confirmation settings" popup:
- Check "Run after installation"
- Click on
Applyto finish
Hardware passtrough
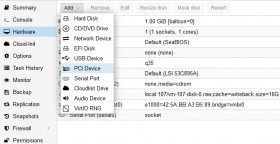
You can pass a full pci (or pcie) device to your VM, like a PCI Sata Controller which have several disks plug on it.
It's now pretty straightforward in recent Proxmox VE.
Click on Add
Select PCI Device

In exemple, to passthrough a SATA controller on a PCIe port with disks attached on it:
- Device: Select SATA controller to passtrough in the dropdown list
- All Functions: Check, ROM-Bar: Check, PCI-Express: Check
HTH,
Michel.
Recommendation
- Keep a copy of the bootloader in case of active bootloader get corrupted
* in the same folder or somewhere safe and easy to access
* if active bootloader is corrupted, just copy (and replace) the backup bootloader to active bootloader
- Use bootloader as usb disk, if you can
- Install dsm OS in a dedicated virtual disk (8GB or 16GB should more than enough)
- do not use this disk as dsm storage disk (or storage pool)
- Install dsm without any additionnal disk (which can be add later)
- Backup your vm
- Then now you can add additionnal disks or passtrough a SATA controller
* configure it as dsm storage disks
* storage disks are separated from OS disk
* this way data are safer cause you can safely unplug data disks for update, manipulation (or OS corruption)
Reference
Forum Xpenology (xpenology.com)
Tutorial: DSM 6.x on Proxmox (Thread on xpenology.com)
Proxmox backup template (Thread on xpenology.com)
Xpenology running on docker (Thread on xpenology.com)
Install Xpenology DSM 6.1.x on Proxmox (uxora.com)
Tutorial to compile xpenology dsm driver (xpenology.club)
Enjoyed this article? Please like it or share it.

Comments
first of all thank you for this very nice howto. It helped me a lot. Got DSM 6.2 running on proxmox 7 without any issue. I now wanted to pass through a SATA controller (iommu is enabled and working). So I added the controller as mentioned as PCIe device which seems to work too. Problem now is: Xpenology now can't seem to find the virtual disk I was booting from before anymore. It always tries to install new. And...as I don't have any disks yet connected it moans about it :-/
I guess I need to change DiskIdxMap as well as SataPortMap values but failed to find a working setup. Any ideas how to set this correctly or change the order of devices?
Many thanks in advance,
Maik
trying to install under ProxMox 7.0 (though I don't think the issue lies here).
File seems to okay as I can open it with OSFmount.
First of all, I would like to clarify that I could install and run it successfully at first.
Then, after I was making some changes to try with another disk configurations I came across Error 13 when I tried to install it again.
So, as I knew that it worked at first time, I was sure that it had to work again somehow. Finally, the solution for me was upload again the bootloader img file as indicated in the process above. After that I was able to install and run it without a problem, as the first time.
I hole this can be helpful for you.
Regards.
I am installing Xpenology on a proxmox machine,
I followed this tutorial all the way.
[censored]s://www.uxora.com/other/virtualization/55-install-xpenology-dsm-6-2-x-on-proxmox
Only change I made was to choose 12 GB drive instead of 16GB, due to the lack of space.
In the step to load the web server, and to upload the DSM_DS3615xs_25426.pat file, I choose the file, Process starts, I get to do partitions 6% then it uploads the file 50% and tries to install it 56% and then I get an error regarding corrupt file (13)
File downloaded from here (5 times) [censored]s://archive.synology.com/download/Os/DSM/6.2.3-25426
Could it be because of the disk size? anyone can help? Thanks!
EDIT 1: Redone the process with 16GB still failing.
but I have an issue, the web server installer where I select the "DSM_DS3615xs_25426.pat" file, gives me an error (13), as soon as the file is uploaded and it tries to install it. Only step I made different was to assign 12GB of hard disk (instead of 16GB), (I don't have more space available on my proxmox server for now)
One tip for the pci pass-through of a Marvell 88SE9230, and possibly others. Passing through using the UI will NOT work - results in a 0000:0a:00.0 in the device field on my system anyway. Due to a bug, controller won't work. However, in the CLI if use qm set 104 -hostpci0 0a:00 it works.
Very well written guide, congrats!
The only problem I had was with Proxmox 7 when I tried "bootloader copy" scp command, returned "no such file or directory". Booting with Parted CD I've observed that directory "107" wasn't created, so I created it with "Parted CD" . Do you know an easier way, without booting with a tertiary tool?
Best regards,
Dorin
I've not yet added my physical drives so I only have the initial virtual drive at the moment. It's labeled as Drive 7. Is there anyway to move it to drive 1... or to drive 25?
Thank you
What can cause this?
I have same issue does anybody has a solution for this. What wrong? Thank you
Im new to promox and I try this several times within VmWare ESXi only that did not work at the end with ESXi.
I will post a repons when it is working and running.
Regards,
Ronny
tout est dans le titre , Merci Michel pour ce super tuto , testé sans soucis , rien a rajouter
RSS feed for comments to this post